Installing wireless security cameras can be a crucial step in securing your home or office. In today’s world, where safety and protection are of utmost importance, having a reliable surveillance system is essential.
But how exactly do you go about installing these cameras?
In this comprehensive 10-step guide, I will walk you through the process, providing you with the necessary knowledge and technical information on how to install wireless security cameras effectively.
So grab your tools and get ready as we embark on this journey together to create a safe and secure environment with our very own wireless security camera system.
Contents
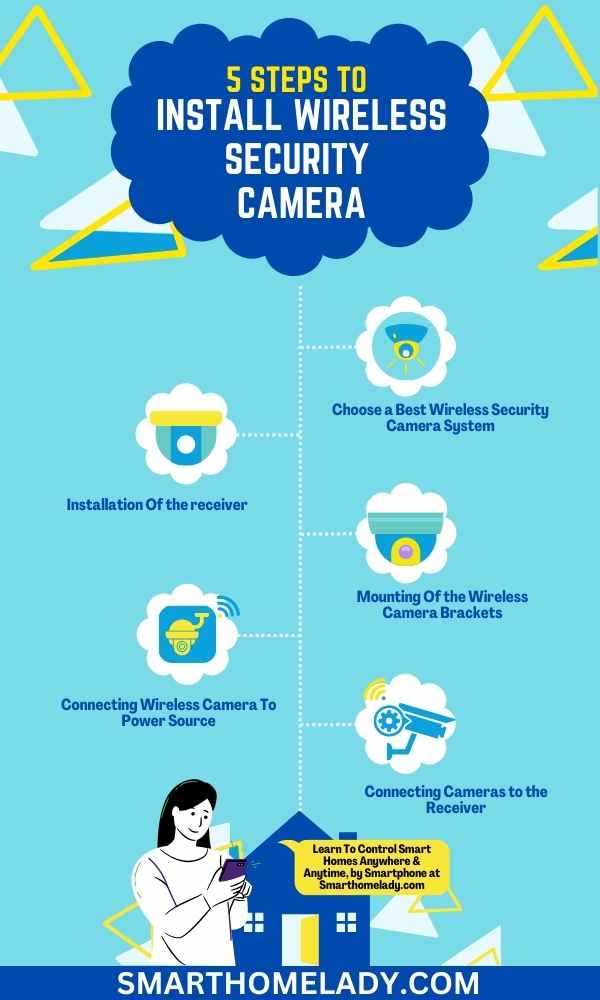
- 1 How do you install a wireless security camera system? 10 Steps To Follow
- 1.1 1. Select a Best Wireless Security Camera System
- 1.2 2. Make A Security Plan For Wireless Camera
- 1.3 3. Check Your WiFi Signals
- 1.4 4. Installation Of the receiver
- 1.5 5. Mounting Of the Wireless Camera Brackets
- 1.6 6. Connecting Wireless Camera To Power Source
- 1.7 7. Connecting Cameras to the Receiver
- 1.8 8. Syn the Wireless Camera With Your System
- 1.9 9. Adjust The Wireless Camera Setting
- 1.10 10. Test, Monitor & Maintain Wireless Camera
- 2 Is it easy to install wireless cameras?
- 3 Do wireless cameras use a lot of Wi-Fi?
- 4 How to install Wi-Fi CCTV at home?
- 5 Do wireless cameras need a router?
- 6 Conclusion
How do you install a wireless security camera system? 10 Steps To Follow
When it comes to installing a wireless security camera system, there are several key points to consider.
- Firstly, it’s crucial to choose the right wireless security camera system that meets your specific needs and requirements.
- Secondly, creating a security plan for your wireless cameras will help ensure optimal placement and coverage.
- Additionally, checking your WiFi signals before installation is essential, as a strong and stable connection is vital for effective monitoring.
Once these steps are completed, you can proceed with installing the receiver and mounting the wireless camera brackets for a comprehensive and secure surveillance system.
1. Select a Best Wireless Security Camera System
To make sure you have the perfect wireless security camera system, it’s vital that you choose one that suits your needs and gives you peace of mind.
When comparing different wireless cameras, there are several factors to consider.
- Firstly, look at the camera resolution and image quality to ensure clear and sharp footage.
- Secondly, consider the camera’s field of view, as a wider angle can cover more area.
- Thirdly, check if the camera has night vision capabilities for round-the-clock surveillance.
- Additionally, it’s important to assess the range of the wireless signal to ensure it reaches all desired areas without interference.
- Lastly, consider whether the camera system offers remote viewing options through a mobile app or web portal for convenient access to live feeds and recordings from anywhere.
By carefully considering these factors, you can select a wireless security camera system that meets your requirements effectively while providing reliable monitoring and protection for your property.
2. Make A Security Plan For Wireless Camera
Start by developing a comprehensive security strategy for your wireless camera system to ensure optimal protection and peace of mind.
Designing the layout of your security plan is crucial in determining the areas you want to monitor and ensuring that there are no blind spots.
Securing camera placement is equally important, as it allows for maximum coverage and minimizes the risk of tampering or theft.
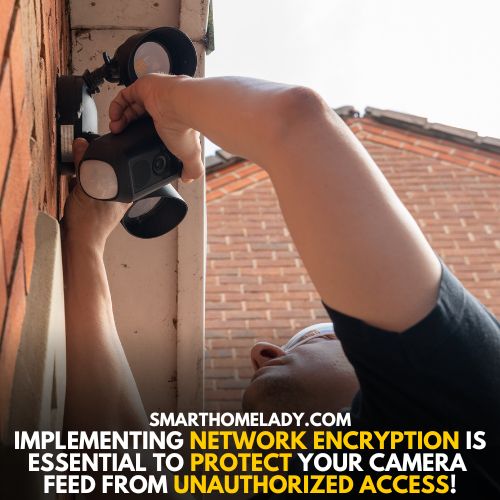
Additionally, implementing network encryption is essential to protect your camera feed from unauthorized access. It ensures that only authorized devices can connect to your camera system, safeguarding your privacy.
Don’t forget to enable remote access so you can monitor your cameras from anywhere using a smartphone or computer, providing flexibility and convenience.
Lastly, regular camera maintenance should be part of your security plan to ensure their functionality and longevity. This includes cleaning lenses, checking connections, and updating firmware regularly to address any vulnerabilities.
Incorporating these elements into your security plan will help maximize the effectiveness of your wireless camera system and provide you with the peace of mind you deserve.
Must Read: Do Wireless Security Cameras Need Internet?
3. Check Your WiFi Signals
Make sure you assess the strength of your WiFi signals before setting up your wireless camera system for optimal performance.
WiFi troubleshooting is essential to ensure that there’s no signal interference or weak connection that could affect the video quality or reliability of your security cameras.
One way to improve your WiFi signal strength is by using wifi extenders or wifi range extenders, which help boost the signal and increase coverage in areas with poor reception.
Additionally, selecting the right wifi channel can also minimize interference from other devices and networks in the area.
By checking your WiFi signals and taking the necessary steps to optimize them, you can ensure the smooth and uninterrupted operation of your wireless security cameras.
4. Installation Of the receiver
Now that you’ve optimized your WiFi signals, let’s move on to installing the receiver for seamless connectivity and uninterrupted footage.
When it comes to troubleshooting receiver installation, there are a few things to keep in mind.
- First, make sure you have the right type of receiver for your wireless camera system. There are different types available, such as USB receivers or network video recorders (NVRs). Check the specifications of your cameras and choose a compatible receiver.
- Placement is also crucial for optimal camera coverage. Place the receiver in a central location, away from walls or other obstructions that could interfere with the signal.
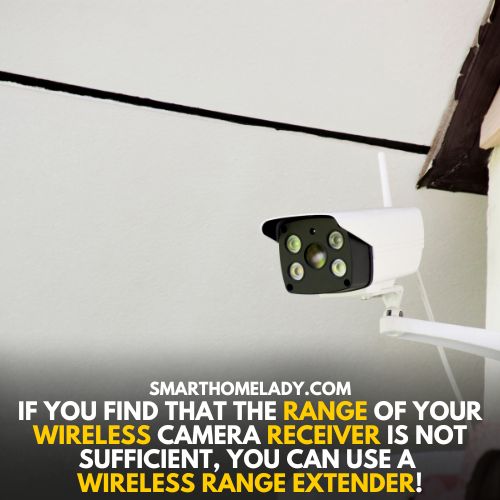
- If you find that the range of your wireless camera receiver is not sufficient, there are ways to extend it. You can use a wireless range extender or position the receiver closer to the cameras.
- Finally, consider compatibility with different camera brands when choosing a receiver. Some receivers may only work with specific brands or models, so be sure to check before making a purchase.
By following these tips and troubleshooting any potential issues during installation, you can ensure the smooth operation of your wireless security camera system.
5. Mounting Of the Wireless Camera Brackets
To ensure optimal camera coverage, place the wireless camera brackets in strategic locations for seamless footage.
When it comes to wireless camera installation, mounting brackets play a crucial role in securing the cameras and ensuring they’re positioned correctly.
The bracket installation process is relatively simple but requires attention to detail.
- Start by identifying the areas where you want to install the cameras and determine the best angles for capturing footage.
- Use a pencil to mark the spots where you’ll mount the brackets on the wall or ceiling.
- Once marked, attach the brackets securely using screws or other mounting hardware provided with your camera kit.
- Make sure to adjust the camera angle on each bracket for proper positioning and aim toward your desired surveillance area.
By following these steps, you can achieve effective wireless camera installation with well-mounted brackets that provide optimal coverage for your security needs.
Must Read: Do Wireless Security Cameras Need Batteries?
6. Connecting Wireless Camera To Power Source
You can easily connect your wireless camera to a power source for uninterrupted surveillance.
When setting up your wireless security camera, it is crucial to ensure that it is properly connected to a reliable power supply. This will ensure that the camera remains operational at all times and provides continuous monitoring of your premises.
To connect the camera to a power source, you will need to locate an electrical outlet within close proximity of the camera’s installation location.
Once you have identified the suitable outlet, plug the power adapter provided with the camera into the outlet.
Then, connect the other end of the power adapter cable to the corresponding port on the back of the camera.
Ensure that both connections are secure and tight to avoid any loose connections or interruptions in the power supply.
It is also important to consider using surge protectors or UPS (Uninterruptible Power Supply) units for added protection against power surges or outages that could potentially affect your camera’s functionality.
7. Connecting Cameras to the Receiver
Once the cameras are properly connected to the receiver, you can experience seamless monitoring of your premises without any interruptions.
The connection between the cameras and the receiver is crucial for ensuring a stable camera signal and reliable footage.
- To connect the cameras to the receiver, first, make sure that both devices are powered on.
- Then, locate the receiver’s input ports and connect each camera’s output cable to its corresponding port on the receiver.
- It’s important to ensure that each camera is connected to its designated port to avoid any confusion or interference with other signals.
- Additionally, pay attention to the placement of the receiver as it should be positioned in an area with minimal obstructions to maximize signal strength.
If you encounter any issues during the connection process or experience a weak camera signal, try troubleshooting by checking all cable connections and ensuring that no obstacles are obstructing the transmission path between the cameras and receiver.
Must Read: How To Connect Wireless Cameras To Phone?
8. Syn the Wireless Camera With Your System
Now that we’ve successfully connected the cameras to the receiver, it’s time to sync the wireless camera with our system.
This step is crucial for ensuring seamless communication between the camera and your monitoring device. To do this, follow these steps:
- Troubleshoot wireless camera connection – Check if there are any obstacles or interference that might be affecting the signal strength.
- Enhance wireless camera signal strength – Consider installing a Wi-Fi range extender or relocating your router closer to the cameras for better signal reception.
- Secure wireless camera footage – Enable encryption protocols like WPA2 on your Wi-Fi network to protect your footage from unauthorized access.
- Integrate wireless cameras with home automation systems – Explore options for integrating your cameras with smart home devices, such as voice assistants or mobile apps, for added convenience and control.
- Expand wireless camera coverage area – If you need to expand coverage beyond what a single camera can provide, consider adding more cameras strategically placed around your property.
By following these steps, you’ll not only ensure a smooth synchronization between your wireless cameras and system but also enhance their performance and security capabilities.
9. Adjust The Wireless Camera Setting
To ensure optimal performance and capture every detail, adjust your wireless camera settings for the best possible image quality.
Wireless camera troubleshooting is an essential step in setting up your security system.
- Start by adjusting the camera angles to cover the desired area effectively. Experiment with different positions and angles to find the best vantage point.
- Additionally, consider optimizing camera performance by adjusting settings such as resolution, frame rate, and motion detection sensitivity. These settings can be accessed through the camera’s software or mobile app.
- Troubleshooting camera connectivity issues may involve checking signal strength, ensuring proper Wi-Fi network configuration, and updating firmware if necessary.
By following these wireless camera setup tips and fine-tuning your camera settings, you can enhance both the functionality and reliability of your wireless security system.
10. Test, Monitor & Maintain Wireless Camera
Make sure you regularly test, monitor, and maintain your wireless camera to ensure its effectiveness and reliability.
- It is important to troubleshoot any issues that may arise with your wireless camera, such as connectivity problems or interference.
- Check the range of your wireless camera to ensure it covers the desired area and adjust the placement if necessary.
- Familiarize yourself with the different recording options available on your wireless camera, whether it is continuous recording or motion-activated recording.
Additionally, be aware of any privacy concerns related to your wireless camera and take appropriate following measures to protect your privacy.
- Set a strong password for access.
- Regularly update the firmware.
- Enable encryption protocols.
- Disable remote access when not needed.
By regularly testing, monitoring, and maintaining your wireless camera, you can ensure its optimal performance and peace of mind knowing that it is functioning properly.
| Troubleshooting | Range | Placement | Recording Options |
|---|---|---|---|
| Check for connectivity issues or interference | Ensure coverage of the desired area | Adjust position for optimal view | Choose between continuous or motion-activated recording |
Remember that proper maintenance is key to maximizing the longevity and effectiveness of your wireless security cameras.
Must Read: How Do Wireless Security Cameras Get Power? 3 Ways
Frequently Asked Questions FAQs
Is it easy to install wireless cameras?
Yes, installing wireless cameras can be relatively easy, especially compared to traditional wired cameras.
With no need for complex wiring or drilling, wireless cameras offer a convenient plug-and-play setup.
Most wireless cameras come with detailed instructions, and some even have user-friendly mobile apps that guide you through the installation process step-by-step.
Additionally, many wireless cameras use magnetic mounts or adhesive pads, allowing you to easily attach them to walls, ceilings, or other surfaces.
Do wireless cameras use a lot of Wi-Fi?
Wireless cameras do use Wi-Fi, but they generally don’t consume a significant amount of bandwidth.
The amount of Wi-Fi usage depends on factors such as the camera’s resolution, frame rate, and the number of cameras connected to the network.
However, modern wireless cameras are designed to optimize data transmission, ensuring minimal impact on your Wi-Fi performance.
Some advanced wireless cameras even utilize technologies like H.265 video compression to reduce file sizes without compromising image quality.
So, while wireless cameras do utilize Wi-Fi, you shouldn’t worry about them overwhelming your network capacity in most cases.
How to install Wi-Fi CCTV at home?
Installing Wi-Fi CCTV (Closed-Circuit Television) at home can be done in a few simple steps:
Step 1: Choose the right CCTV system
Look for a Wi-Fi-enabled CCTV system that suits your needs. Consider factors like camera resolution, night vision capabilities, and whether you prefer standalone cameras or a complete surveillance kit.
Step 2: Position the cameras
Determine the areas you want to monitor and find suitable locations for your cameras. Ensure they have a clear view and are mounted securely.
Step 3: Connect the cameras to the power
Wireless cameras still require a power source, so connect each camera to a power outlet nearby.
If you prefer a wire-free setup, consider battery-powered cameras that eliminate the need for power cables.
Step 4: Connect the cameras to Wi-Fi
Follow the manufacturer’s instructions to connect the cameras to your home Wi-Fi network.
This usually involves using a mobile app or a web interface to scan for available Wi-Fi networks and entering your network credentials.
Step 5: Configure and access the cameras
Once connected, you can customize camera settings, such as motion detection, notifications, and storage options.
You can usually access the camera feeds remotely using a mobile app or a web browser, providing you with convenient remote surveillance.
Do wireless cameras need a router?
Yes, wireless cameras require a Wi-Fi router to function properly. The router acts as the central hub that connects the cameras to your home network and the internet.
By connecting the wireless cameras to your router, they can transmit video feeds wirelessly to your devices, such as smartphones, tablets, or computers.
The router provides the necessary communication and data transfer between the cameras and your viewing devices.
Therefore, a stable and reliable Wi-Fi connection provided by a router is essential for wireless cameras to operate effectively.
Conclusion
In conclusion, installing wireless security cameras can be a complex process, but by meticulously following these 10 steps, you will have successfully installed wireless security cameras that provide peace of mind and enhanced protection for your property.
Remember to periodically check and maintain your surveillance system to ensure its continued functionality and effectiveness in keeping you safe.
Sources
- How wireless will change agriculture. Precision agriculture. (Source Link)
- Advanced Hack: Wireless Camera Installation. The Robosapien Companion: Tips, Tricks, and Hacks (Source Link)
- The security camera system can be accessed on mobile with the internet from remote places. (Source Link)