In a world where home security is paramount, the sensitivity of your Blink camera can make all the difference. Imagine a surveillance system that not only captures every important moment but also filters out unnecessary noise.
That’s where Blink camera sensitivity comes into play, offering a smart solution to home monitoring.
But what exactly is Blink camera sensitivity, and how can you make it work for you? In this article, we’re going to delve into the fascinating world of Blink camera sensitivity.
So, let’s get started.
Contents
- 1 What Is A Good Sensitivity For Blink Camera – 3 Levels For Different Conditions
- 2 Few Misconceptions About Blink Camera Sensitivity
- 3 4 Factors Affecting Blink Camera Sensitivity
- 4 How to Adjust Blink Camera Sensitivity – Step-by-Step Guide
- 5 Common Mistakes To Avoid When Adjusting Blink Camera Sensitivity
- 6 blink camera sensitivity not working – Troubleshooting
- 7 Why is the sensitivity of my Blink camera not working?
- 8 How do I make my blink camera more sensitive?
- 9 What is the difference between activity zone and privacy zone?
- 10 Conclusion
What Is A Good Sensitivity For Blink Camera – 3 Levels For Different Conditions
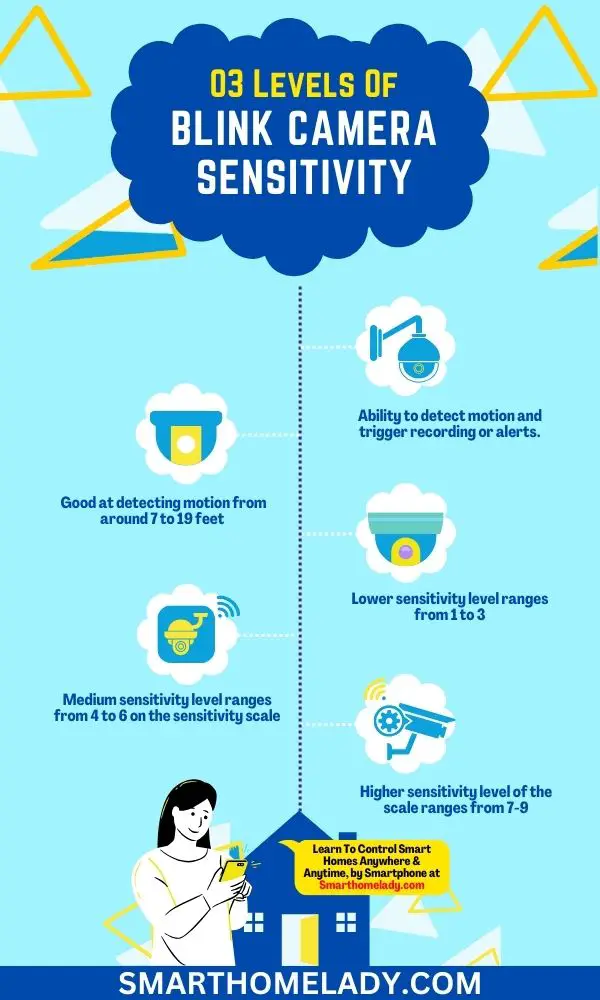
Sensitivity in Blink cameras refers to the device’s ability to detect motion and trigger recording or alerts.
It’s a vital feature that ensures your camera captures relevant events while minimizing false alarms.
Blink offers various sensitivity levels from Low to High, allowing you to customize your camera’s behavior to suit your specific needs.
Quick Answer
Blink cameras are usually good at detecting motion from around 7 to 19 feet (2 to 6 meters) away. So, in my experience and research, a sensitivity level between 5-7 is often the best sensitivity.
Let’s discuss the scale of the Blink camera sensitivity level.
1. Low Sensitivity Level Of Blink Camera
At the lower end of the scale (from 1 to 3), we have low sensitivity. This setting is all about being super selective. It makes your camera less sensitive, so it only records when there’s a significant motion.
A low Sensitivity level setting is ideal for areas with minimal activity or where you want to reduce unnecessary alerts.
For instance, if you have a Blink camera keeping an eye on a quiet hallway inside your home, you wouldn’t want it recording every time a shadow moves. In this case, a sensitivity level of 2 or 3 is perfect.
2. Medium Level Of Blink Camera Sensitivity Is Best
Now, let’s talk about the medium sensitivity level, which ranges from 4 to 6 on the sensitivity scale.
This is the optimal setting for most Blink camera users, including myself. It keeps a balance between capturing important events and avoiding excessive notifications or extra battery usage.
For instance, if you’ve got a Blink camera watching your front porch. You want to be notified when a package arrives or when someone’s at your door. But you don’t need alerts for every passing car or fluttering leaf. A sensitivity level of 5 is often just right for these situations.
3. High Level Of Blink Camera Sensitivity
When you set up the sensitivity to the higher end of the scale (7-9), you’re essentially telling your Blink camera to be super alert and responsive.
It’ll detect even the slightest movements and spring into action. This setting is perfect if you want to capture every little thing happening in the camera’s view.
For example, if you’ve got a Blink camera watching your backyard, setting it to a high sensitivity level (say, 8 or 9) ensures it records every little thing—be it a squirrel climbing a tree or a raccoon sneaking around. It’s like having a hyper-aware guardian for your outdoor space.
Personal Experience
I’ve found that experimenting with sensitivity levels is crucial to achieving the desired results. Blink’s user-friendly app makes it easy to switch between these settings and fine-tune them as needed.
Remember, what works best for one situation may not be ideal for another, so don’t be afraid to adjust your camera’s sensitivity based on your unique requirements
Few Misconceptions About Blink Camera Sensitivity
By setting the right level of sensitivity, you can ensure that your camera captures every movement and activity around your property, providing you with a sense of safety and peace of mind.
One common misconception about blink camera sensitivity is that higher sensitivity means better security.
While it’s true that increasing the sensitivity can help capture more motion events, it can also lead to false alarms triggered by things like moving shadows or passing cars.
Finding the right balance is crucial for avoiding unnecessary notifications while still capturing important events.
Another misconception is that low sensitivity means less effective surveillance. However, if the sensitivity is set too low, your camera may not detect certain motions or activities, leaving blind spots in your security coverage.
It’s essential to balance reducing false alarms and ensuring comprehensive monitoring.
Read More About Blink Cameras
4 Factors Affecting Blink Camera Sensitivity
As someone who’s got plenty of hands-on experience with Blink security cameras, I’m here to share the inside scoop on the factors that can impact the sensitivity of your Blink camera.
Let’s discuss these factors:
1. Location and Placement
Where you put your camera matters. If it’s positioned in a high-traffic area, like a busy street, you might want to lower the sensitivity to avoid being bombarded with notifications from passing cars and pedestrians.
On the other hand, if it’s in a quiet spot, like a backyard, you can increase the sensitivity to capture even subtle movements.
2. Environmental Conditions
Weather and lighting conditions can influence sensitivity. Bright daylight may require lower sensitivity, while low-light situations or nighttime may call for higher sensitivity.
So, take into account the time of day and the weather when setting your camera’s sensitivity.
3. Object Distance
Consider the distance between your camera and what it’s monitoring. Adjust sensitivity based on whether you’re trying to capture distant actions or close-up movements.
If your camera is quite far from the area of interest, you might need to increase sensitivity to ensure it captures distant movements effectively.
Conversely, if it’s close to the action, lower sensitivity could be the way to go to prevent oversensitivity and false alarms.
4. Desired Use Case Of Blink Camera
Ultimately, what you want to achieve with your Blink camera affects sensitivity. Are you using it to monitor a busy street, your front porch, or a quiet hallway inside your home?
Each scenario needs a different sensitivity level. For instance, you’d want higher sensitivity for security purposes but lower sensitivity for minimizing false alarms indoors.
How to Adjust Blink Camera Sensitivity – Step-by-Step Guide
By following this step-by-step guide, you can easily customize the sensitivity of your Blink camera. Adjusting the motion detection sensitivity settings allows you to fine-tune how your camera detects and captures movement.
Here’s how you can do it:
Step 1 – Open the Blink App
Start by opening the Blink app on your smartphone or tablet. If you haven’t already, make sure you’ve set up your Blink camera and added it to the app.
Step 2 – Select the Camera
Once you’re in the app, select the Blink camera you want to adjust sensitivity for. It should be listed in your device list.
Step 3 – Tap on “Camera Settings”
Look for the “Camera Settings” option for the selected camera. It’s usually represented by a gear icon. Tap on it to access the camera’s settings.
Step 4 – Choose “Motion Detection Sensitivity”
In the camera settings menu, scroll down until you find the “Motion Detection Sensitivity” option. This is where the magic happens.
Step 5 – Adjust the Sensitivity
- Now, you can customize your camera’s sensitivity. You’ll typically see a scale from low to high or a numerical range.
- Slide the sensitivity level to your desired setting. If you want your camera to be less sensitive, move it towards the “Low” or lower numbers.
- For higher sensitivity, slide it towards the “High” or higher numbers.
Step 6 – Test and Fine-Tune
After adjusting the sensitivity, it’s a good idea to test it out. Walk in front of the camera to see if it triggers as expected. If it’s too sensitive or not sensitive enough, you can always come back and fine-tune it further.
Step 7 – Save Your Settings
Don’t forget to hit the “Save” or “Apply” button to save your new sensitivity settings. This ensures your camera remembers your preferences.
Step 8 – Monitor and Adjust as Needed
Keep an eye on your camera’s performance over time. If you find it’s still capturing too much or missing important events, don’t hesitate to revisit these settings and make adjustments as needed.
And that’s it. You’ve successfully adjusted the sensitivity of your Blink security camera. It’s a simple process that allows you to tailor your camera’s performance to your specific needs.
Read More About Blink Cameras
Common Mistakes To Avoid When Adjusting Blink Camera Sensitivity
Properly adjusting the sensitivity of your blink camera is crucial for capturing accurate footage and ensuring reliable security.
Here are some common mistakes to avoid when adjusting blink camera sensitivity:
- Setting the sensitivity too high – This can lead to false alarms triggered by minor movements or changes in lighting conditions.
- Setting the sensitivity too low – In this case, your blink camera may not detect important events or movements, compromising its effectiveness as a security measure.
- Not considering environmental factors – Different weather conditions such as rain, snow, or direct sunlight can impact the performance of your blink camera’s motion sensors.
- Ignoring potential obstructions – Placing your blink camera behind objects like trees or bushes can obstruct its field of view and hinder motion detection.
blink camera sensitivity not working – Troubleshooting
Ensure that you have positioned the camera in an optimal location and no obstructions hinder its motion detection capabilities. This will help minimize false motion alerts with your blink camera.
However, if you are still experiencing sensitivity issues, here are some troubleshooting tips to improve it:
| Common Causes of False Motion Alerts | Troubleshooting Tips |
|---|---|
| 1. Strong direct sunlight | Adjust camera angle to avoid direct sunlight hitting the lens. |
| 2. Moving trees or plants | Trim or relocate any vegetation that may trigger false alerts. |
| 3. Reflections from glass surfaces | Reposition the camera away from reflective surfaces like windows. |
| 4. Insects or small animals | Clean the lens regularly and remove any potential attractants nearby. |
By addressing these common causes, you can enhance the sensitivity of your blink camera for accurate motion detection without unnecessary false alerts.
Additionally, ensure that your firmware is up to date by regularly checking for updates on the Blink app or website. Outdated firmware can sometimes cause sensitivity issues.
Frequently Asked Questions FAQs
Why is the sensitivity of my Blink camera not working?
If you find that the sensitivity of your Blink camera isn’t working as expected, it can be frustrating, but there are several possible reasons for this issue:
Outdated Firmware – If your camera’s firmware is not up to date, it might not function correctly. Firmware updates often include bug fixes and performance improvements, so ensure your camera is running the latest version.
Camera Placement – The location and positioning of your camera can significantly impact sensitivity. Placing it in direct sunlight or a high-traffic area may lead to erratic sensitivity. Consider repositioning the camera for better results.
Environmental Factors – Extreme weather conditions, such as heavy rain or snow, can affect sensitivity settings. Check if adverse weather is influencing the camera’s performance and take measures to protect it if necessary.
Low Battery Levels – Low battery power can impact your camera’s overall performance, including sensitivity settings. Make sure your camera has sufficient battery life or replace/recharge the batteries as needed.
How do I make my blink camera more sensitive?
To make the Blink camera more sensitive, you should increase its sensitivity to a high scale. To increase the sensitivity of your Blink camera, follow these steps:
– Open the Blink app.
– Select the camera you want to adjust.
– Navigate to “Camera Settings.”
– Find “Motion Detection Sensitivity” and increase the sensitivity level to capture more motion.
What is the difference between activity zone and privacy zone?
Activity zones are areas you define within the camera’s field of view where you want to receive motion alerts and capture events.
They help reduce false alarms by focusing on specific areas of interest, like a doorway or driveway.
Privacy zones are the opposite; they are areas within the camera’s view where you want to block motion detection and recording.
This feature allows you to respect the privacy of neighbors or areas not meant for monitoring, such as windows facing a neighbor’s property.
Conclusion
Understanding and adjusting the sensitivity of your Blink camera is crucial for optimal performance.
Factors such as lighting conditions, motion detection range, and placement can all affect the sensitivity levels.
By troubleshooting any sensitivity issues and following a step-by-step guide for adjustment, you can ensure that your Blink camera captures the desired footage without unnecessary false alarms.
Implementing best practices like avoiding direct sunlight or reflections will further optimize the camera’s sensitivity and enhance its overall effectiveness in monitoring your surroundings.