One of the most popular home security cameras on the market is the Blink Camera, which is known for its easy installation and wireless setup.
If you’ve recently purchased a Blink Camera and looking at how to connect Blink camera to WiFi, this guide will walk you through the simple steps to get your camera up and running in no time.
With the help of this article, you’ll be able to easily connect your Blink Camera to your home’s WiFi network and start monitoring your home’s activity.
So go ahead and follow my detailed guide – in no time at all, you’ll have seamless access to live video footage from anywhere in the world.
Contents
- 1 8 Simple Ways On How To Connect Blink Camera to WiFi
- 2 How to connect Blink camera to new WiFi – 4 Step To Consider
- 3 How to change WiFi on Blink Sync Module 2 – Step-By-Step Way
- 4 Why won’t my Blink camera connect to Wi-Fi?
- 5 How do I reset my Blink camera Wi-Fi?
- 6 How do I get my Blink sync module back online?
- 7 How do I pair my Blink camera?
- 8 Conclusion
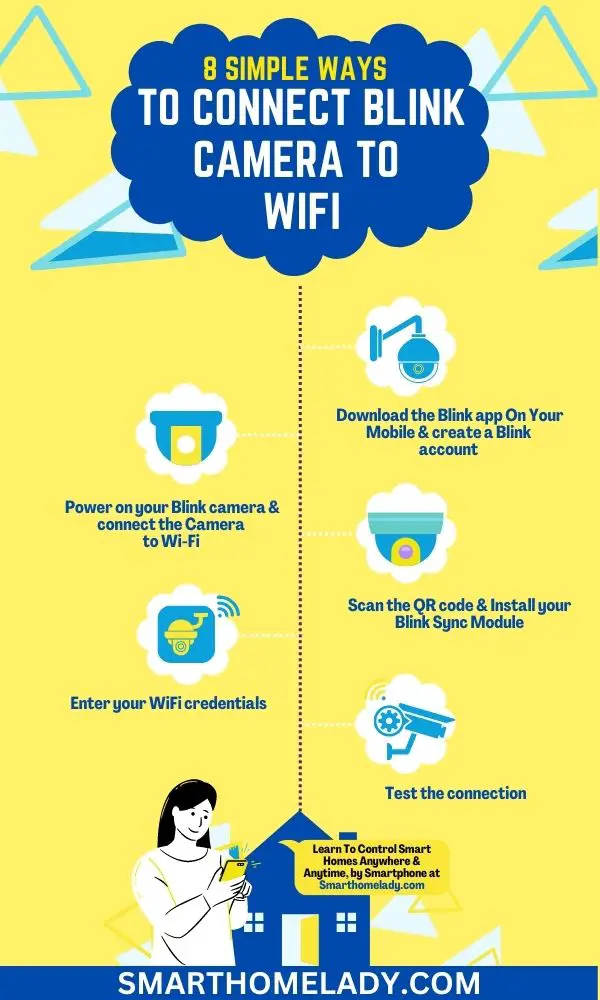
8 Simple Ways On How To Connect Blink Camera to WiFi
To connect your Blink camera to WiFi, you need to follow these 8 steps. Here are 8 quick steps to connect Blink camera to WiFi.
1. Download the Blink app On Your Mobile
After you’ve finished setting up your Blink camera, the next step is to connect it to WiFi. For this purpose, download the Blink app onto your smartphone or tablet.
The Blink app is essential for connecting your camera to WiFi and accessing its features. It allows you to view live feeds, receive motion alerts, customize settings, and more.
By downloading the Blink app and utilizing its features, you can ensure a smooth and reliable connection between your camera and WiFi network.
If Blink Camera is not connecting to WiFi, it could be due to various reasons. Read these reasons: Blink Camera Not Connecting To WiFi – Reasons & Troubleshooting
2. Create a Blink account on the App
Before diving into the world of Blink cameras, it’s crucial to create a Blink account. This opens up a world of possibilities for managing your security system.
To create a Blink account, follow these steps:
- Download the Blink app on your smartphone from the App Store or Google Play.
- Open the app and tap on ‘Sign Up’ to start creating your account.
- Enter your email address and choose a strong password to secure your account.
- Follow the on-screen instructions to complete the registration process.
Once you’ve successfully created your Blink account, you can proceed with;
- Setting up your Blink camera
- Troubleshooting any issues that may arise
- Exploring various Blink camera features such as motion detection and two-way audio communication
- Updating the firmware of your blink camera for improved performance
- Accessing cloud storage options for securely storing recorded videos.
Your Blink account acts as a central hub for managing all these aspects of your security system effortlessly.
3. Power on your Blink camera
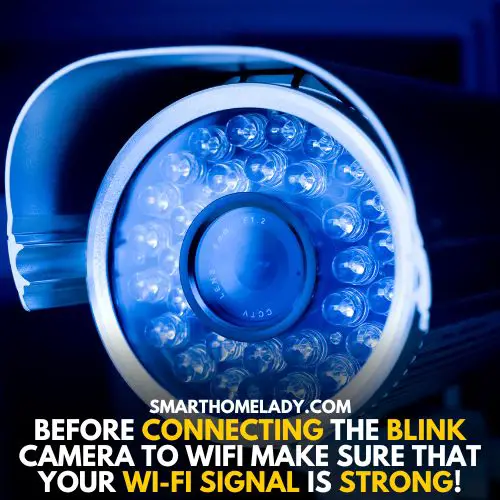
Once you’ve installed the Blink Sync Module, simply power on your camera to begin enjoying its features. To ensure a smooth connection and optimal performance, it’s important to have a strong Wi-Fi signal for reliable camera performance.
Consider placing your router in a central location and minimizing obstructions that may interfere with the signal strength.
Here are a few tips that you should follow when connecting the Blink camera with WiFi.
| Troubleshooting blink camera connectivity | Tips for improving wifi signal strength | Understanding blink camera settings | Best practices for positioning blink cameras | Integrating blink cameras with smart home systems |
|---|---|---|---|---|
| Make sure all cables are properly connected | Position the router in a central location | Customize motion detection sensitivity | Avoid pointing cameras directly at bright lights | Explore compatibility with smart home platforms |
| Check Wi-Fi network is working properly | Minimize obstructions | Adjust video quality | Mount cameras at an appropriate height | Utilize voice commands through virtual assistants |
| Restart both the sync module and camera | Update router firmware | Set up scheduled arming/disarming | Use multiple cameras to cover larger areas | Control cameras through smartphone apps |
4. Connect the Camera to Wi-Fi
Connecting the Camera to Wi-Fi is a straightforward process that involves a few simple steps.
- First, make sure that your smartphone or tablet is connected to the same Wi-Fi network that you want to connect the Blink camera to.
- Open the Blink app and select the “Add a System” option.
- Then, follow the on-screen instructions to scan the QR code on the back of your camera or manually enter its serial number.
- Once the camera is recognized by the app, it will prompt you to enter your Wi-Fi network’s password.
For added security, consider enabling encryption protocols like WPA2 on your Wi-Fi network.
5. Scan the QR code
To continue setting up your Blink camera and connect it to Wi-Fi, the next step is to scan the QR code. This code contains important information that will help establish a secure connection between your camera and the Wi-Fi network.
- Click on the option to add a new device, and select ‘Scan QR Code.’
- Hold your device’s camera over the QR code provided with your camera until it is successfully scanned.
6. Install your Blink Sync Module
Ready to get your Blink camera up and running? Let’s start by installing the Blink Sync Module.
The Sync Module is an essential component that connects your Blink cameras to your Wi-Fi network, allowing you to access them remotely.
- To begin, ensure that the Sync Module is placed within range of your router for a stable connection.
- Next, plug in the power adapter provided with the module and connect it to a power outlet.
- Once powered on, open the Blink app on your smartphone and navigate to the ‘Add A System’ option.
- Follow the on-screen instructions to pair the Sync Module with your account.
If you encounter any connectivity issues during this process, make sure that your Wi-Fi signal is strong and check if there are any obstructions hindering communication between devices.
Read More About Blink Cameras
- Blink Camera Not Detecting Motion
- Reasons Why Is Your Blink Camera Offline?
- Blink Camera Blinking Red – Reasons & Troubleshooting
After successfully adding your system, you can proceed to set up multiple cameras on the same network by selecting ‘Add Device’ in the app’s menu.
With these steps completed, you’re now ready to maximize your Blink camera experience!
7. Enter your WiFi credentials
Now it’s time for you to enter your WiFi credentials and get your Blink camera connected to the network. To start, make sure you are in close proximity to your WiFi router.
- Next, tap on “Connect to Wi-Fi.” You will see a list of available networks, so choose yours from the options provided.
- If you can’t find your network, try refreshing the list or restarting your phone.
- Once you’ve selected your network, enter its password in the designated field. Make sure to double-check for any typos or mistakes before proceeding.
- Tap on “Connect” and wait for a moment as the app connects your camera to the WiFi network.
Ensure that you have a strong and secure WiFi connection by following some wifi security tips like using strong passwords and enabling encryption.
8. Test the connection
After entering your WiFi credentials, it’s time to ensure the connection is strong and stable by testing it.
To troubleshoot any potential issues, start by checking the signal strength of your camera. Ensure that it is placed within a reasonable range from your WiFi router to avoid any interference or weak signals.
If needed, you can optimize the signal strength by adjusting the position of your camera or using WiFi extenders.
Once you have confirmed a good signal, test the functionality of your Blink camera by accessing live video feeds through the Blink app or website. This will help verify that the camera is connected properly and transmitting data effectively.
Additionally, if you have other smart home devices in your network, integrate them with your Blink camera to enhance security and convenience features like motion detection triggering lights or alarms.
Lastly, make sure to secure your camera network by setting up a strong password and enabling two-factor authentication for added protection against unauthorized access.
How to connect Blink camera to new WiFi – 4 Step To Consider
- First, you’ll need to make sure your Blink camera is powered on and ready for setup. Once that’s done, you can begin the connecting process by opening the Blink app on your smartphone or tablet.
- Tap on the ‘+’ icon to add a new device and select ‘Blink Camera’ from the list of options. Follow the on-screen instructions to choose your camera placement and adjust any necessary camera settings.
- Next, select your WiFi network from the available options and enter your network password when prompted. If you encounter any issues during this process, refer to the troubleshooting tips provided in the app or consult Blink’s support documentation online.
- Once connected, you can also explore video storage options such as cloud storage or local storage using a USB drive.
With these steps completed, your Blink camera should now be successfully connected to your new WiFi network.
How to change WiFi on Blink Sync Module 2 – Step-By-Step Way
Changing the WiFi on your Blink Sync Module 2 will give you a sense of empowerment and freedom to connect your cameras wherever you desire.
To change the WiFi settings on your Blink Sync Module 2, follow these steps:
- Ensure that your mobile device is connected to the new WiFi network you want to use with your cameras.
- Open the Blink app on your mobile device and tap on the ‘Sync Module’ tab at the bottom of the screen.
- Select the specific sync module you want to change the WiFi for.
- Tap on ‘Edit Wi-Fi Settings’ and then choose ‘Change Network’.
- The app will prompt you to press and hold down the button on top of your sync module until it starts flashing blue. Once it starts flashing blue, tap ‘Continue’ in the app.
- The app will now guide you through a series of steps to connect your sync module to the new WiFi network.
- Follow these steps carefully, entering all necessary information such as network name (SSID) and password when prompted.
With this comprehensive step-by-step process, you can overcome any challenges related to setting up or changing WiFi connections for your Blink cameras using a Blink Sync Module 2.
Read More About Blink Cameras
- Blink Camera Blinking Green
- Blink Camera Blinking Blue – Purpose & Solution
- How To Prevent Blink Camera From Being Stolen?
Frequently Asked Questions FAQs
Why won’t my Blink camera connect to Wi-Fi?
There could be several reasons why your Blink camera is not connecting to Wi-Fi.
Firstly, ensure that you are within the range of your Wi-Fi network. Check if other devices are successfully connecting to the same network to rule out any network issues.
If the issue persists, try the following troubleshooting steps:
– Power cycle your Blink camera by unplugging it from the power source, waiting for a few seconds, and plugging it back in.
– Ensure that your Wi-Fi network is functioning properly by restarting your router.
– Reset your Blink camera’s Wi-Fi settings by pressing and holding the reset button on the camera until the LED light starts flashing rapidly. Then, follow the setup process to reconnect it to Wi-Fi.
How do I reset my Blink camera Wi-Fi?
To reset the Wi-Fi settings on your Blink camera, follow these steps:
– Locate the reset button on the back or bottom of your Blink camera.
– Press and hold the reset button for about 10-15 seconds until the LED light on the camera starts flashing rapidly.
– Release the reset button and wait for your Blink camera to restart.
– After the restart, your camera’s Wi-Fi settings will be reset, and you can proceed with the setup process to connect it to a new Wi-Fi network.
How do I get my Blink sync module back online?
If your Blink sync module is offline, try the following steps to get it back online:
– Ensure that the sync module is connected to a power source and the power cable is securely plugged in.
– Check if the Ethernet cable connecting the sync module to your router is properly connected on both ends.
– Restart your sync module by unplugging it from the power source, waiting for a few seconds, and plugging it back in.
– Make sure your router is functioning correctly by restarting it.
– If none of the above steps work, try resetting your sync module by pressing and holding the reset button on the back until the LED light starts flashing blue. Then, follow the setup process to reconnect it to your Blink system.
How do I pair my Blink camera?
To pair your Blink camera with the Blink sync module, follow these steps:
– Ensure that your Blink sync module is set up and online.
– Open the Blink app on your smartphone and log in to your account.
– Tap on the “+”icon to add a new device and select “Blink Camera.”
– Follow the on-screen instructions to scan the QR code on the camera or manually enter the serial number.
– Place your Blink camera within range of the sync module, and it will automatically pair with the module.
– Once paired, you can customize the camera settings and monitor it through the Blink app.
Conclusion
In conclusion, connecting your Blink camera to WiFi is a simple and straightforward process. By following the step-by-step instructions provided in this article, you can easily set up your camera and ensure that it’s connected to your home network.
Remember to have your WiFi network name and password handy before starting the process.
Once you follow these steps carefully, your Blink camera will connect to WiFi within minutes.
Enjoy peace of mind knowing that you can easily keep an eye on things from anywhere using just a smartphone and an internet connection.