Have you bought a new Wyze Cam and are looking for a way “How to setup Wyze Cam?” Then, get ready to set up your new Wyze camera. This simple step-by-step guide will walk you through the entire process.
- You’ll start by getting the things you need to set up a Wyze Cam and then downloading the Wyze app to your smartphone.
- After powering on the camera, you’ll connect it to your Wi-Fi network and position it in the ideal spot.
- I’ll also show you how to set up motion detection and notifications, adjust camera settings, and troubleshoot any issues that may arise.
Let’s get started.
Contents
- 1 8 Steps On How To Setup Wyze Camera
- 1.1 Step 1 – Get The Necessary Things
- 1.2 Step 2 – Downloading the Wyze App
- 1.3 Step 3 – Create An Account On Wyze App
- 1.4 Step 4 – Powering Your Wyze Cam To A Power Source
- 1.5 Step 5 – Add Device On Wyze App
- 1.6 Step 6 – Connecting the Camera to Wi-Fi
- 1.7 Step 7 – Positioning and Mounting the Camera
- 1.8 Step 8 – Setting Up Motion Detection and Notifications
- 2 Troubleshooting and Tips For Setting Up Wyze Cam
- 3 Frequently Asked Questions FAQs
- 4 Can I set up my Wyze camera without WiFi?
- 5 Can someone else connect to my Wyze camera?
- 6 Can I use my WYZE cam without a subscription?
- 7 Conclusion
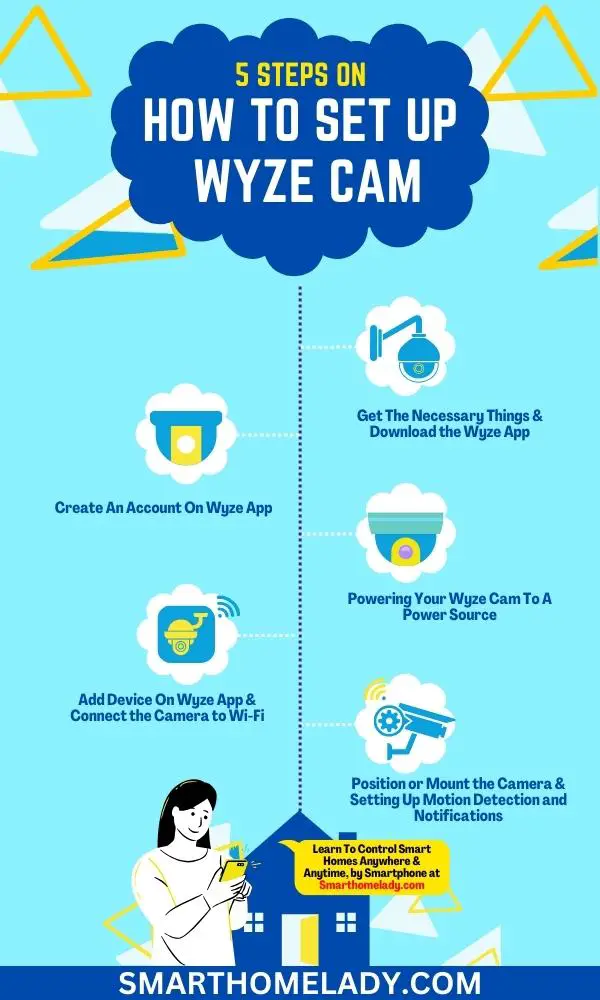
8 Steps On How To Setup Wyze Camera
Before discussing the steps to set up a Wyze camera, it is important to note that the process may vary depending on the specific model.
However, setting up a Wyze camera generally involves connecting it to a power source, downloading the Wyze app, and following the in-app instructions to connect the camera to your Wi-Fi network.
Step 1 – Get The Necessary Things
You should start by ensuring that you have everything you need. When you receive your Wyze camera, open the box and carefully inspect its contents.
Before setting up the Wyze cam, you should have the following items;
- Wyze camera
- A power USB cable
- A wall adapter
- A smartphone or tablet
- Stable WiFi Connection
- SD card, if required
Step 2 – Downloading the Wyze App
To begin, download the Wyze App onto your smartphone or tablet. This app is essential for configuring camera settings and troubleshooting connectivity issues.
- First, go to the App Store (for iOS) or Google Play Store (for Android) on your device.
- Search for ‘Wyze’ and tap on the Wyze app when it appears in the search results.
- Then, tap the ‘Install’ button to download the app.
Suggested Readings On Wyze Cam
- How To Factory Reset Wyze Camera? Step By Step Guide
- How To Change WiFi On Wyze Camera – A Step By Step Guide
- All Wyze Devices Offline – Quick & Easy Ways
- Wyze Camera Offline – 6 Reasons and Quick Solutions
Step 3 – Create An Account On Wyze App
- Once the app is installed, open it and create a new account by tapping on ‘Sign Up.’
- Follow the prompts to enter your email address and create a password.
- After creating an account, sign in using your credentials.
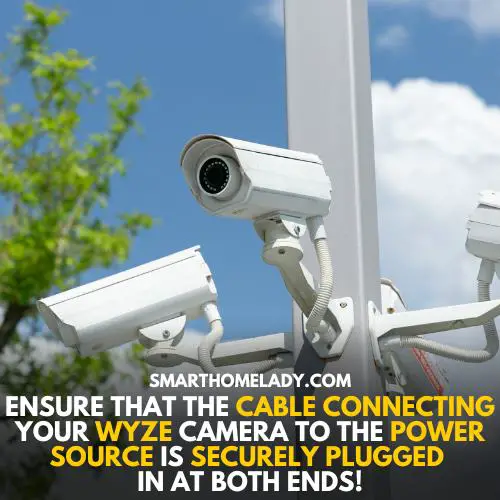
Step 4 – Powering Your Wyze Cam To A Power Source
Next, connect your Wyze camera to a power source and wait until you hear a voice prompt saying, ‘Ready to Connect.’
Once the Wyze camera is connected to a power source, it will automatically begin powering on. To ensure a smooth setup process, follow these steps:
- Check the Power Source – Ensure you have plugged the Wyze camera into a working power outlet or USB port. If the camera doesn’t turn on, try using a different power source to rule out any issues with the current one.
- Verify the Cable Connection – Ensure that the cable connecting your Wyze camera to the power source is securely plugged in at both ends. Sometimes, loose connections can prevent proper power transfer.
- Restart the Camera – If your camera still doesn’t power on, try restarting it. To do this, unplug it from the power source and wait for about 10 seconds before plugging it back in. This simple action can often resolve minor glitches.
Note – If you encounter persistent issues with powering on your Wyze camera or need further assistance beyond this basic troubleshooting guide, refer to the official camera setup guide provided by Wyze or reach out to their customer support for personalized help.
Step 5 – Add Device On Wyze App
Tap on ‘+’ at the top right corner of the app’s home screen and select ‘Add Device.’
Choose ‘Camera’ as the device type and follow the instructions in the app to connect your camera to Wi-Fi.
Step 6 – Connecting the Camera to Wi-Fi
The next step is to connect it to your Wi-Fi network. This will allow you to access the camera’s live feed and recordings remotely from your phone or computer.
Suggested Readings On Wyze Cam
- Wyze Cam Won’t Scan QR Code – 8 Troubleshooting Steps
- Wyze Camera Not Recording Events – 08 Causes With Fixes
- 5 Reasons Your Wyze Camera Not Working – Quick Solutions
- Wyze Camera Not Connecting? Cause And Troubleshooting
To get started, ensure your Wi-Fi network is working properly, and you have the correct login credentials.
- To connect your Wyze camera to Wi-Fi, open the Wyze app on your device and select the camera you want to set up.
- Tap on ‘Settings’ followed by ‘Device Info.’
- Next, tap ‘Wi-Fi Settings’ and ‘Set Up Wi-Fi.’ The app will guide you through the process of selecting your Wi-Fi network and entering its password.
It’s also important to secure your Wyze camera network for privacy reasons. Make sure that both your router and Wyze camera firmware are up-to-date with the latest security patches.
Use a strong password for both your router and Wyze account login. Avoid using default passwords, as hackers can easily guess them.
Step 7 – Positioning and Mounting the Camera
The next step in setting up your Wyze camera is positioning and mounting it in the desired location. Proper camera positioning and mounting are crucial for optimal performance and coverage.
Here are some important factors to consider:
- Location – Choose a spot that provides a clear view of the area you want to monitor. Avoid obstructions like walls or objects that may block the camera’s field of view.
- Height – Mount the camera at an appropriate height for maximum coverage and security. A higher position can help prevent tampering while ensuring a wide-angle view.
- Angle – Adjust the camera’s angle to capture the desired area effectively. Tilt it slightly downwards to avoid excessive sky or ground in your footage.
To help you better understand these concepts, here’s a table illustrating different scenarios:
| Scenario | Recommended Positioning | Ideal Mounting Height |
|---|---|---|
| Indoor | Near entry points | 6-8 feet |
| Outdoor | Overlooking driveway | 10-12 feet |
| Baby Monitor | Facing crib | 4-5 feet |
Step 8 – Setting Up Motion Detection and Notifications
To receive motion detection alerts on your phone, make sure you have enabled notifications in the Wyze app. Once you’ve done that, you can easily set up and customize your motion detection settings to suit your preferences.
- First, open the Wyze app and select the camera you want to adjust.
- Tap on the gear icon in the top right corner to access the camera’s settings.
- Scroll down until you find ‘Detection Settings’ and tap on it.
- Here, you can adjust various aspects of your motion detection. One important setting is the motion detection sensitivity.
Depending on your needs, you can choose between low, medium, or high sensitivity levels. If you find that you’re getting too many false alerts, try lowering the sensitivity level.
Suggested Readings On Wyze Cam
- Wyze Camera Not Connecting To WiFi – 8 Ways To Fix It
- Wyze Cam Constant Yellow Light & 5 Ways To Fix It
- Why Is Wyze Base Station Not Connecting – 9 Ways To Fix
- Wyze Camera Stuck On Ready To Connect – 8 Ways To Fix Your Problem
Troubleshooting and Tips For Setting Up Wyze Cam
If you’re experiencing any issues with your camera, try resetting it by unplugging the power cord and plugging it back in. This simple step can often resolve common issues and Wi-Fi connectivity problems.
However, if the problem persists, here are some additional troubleshooting tips to help you get your Wyze camera up and running smoothly.
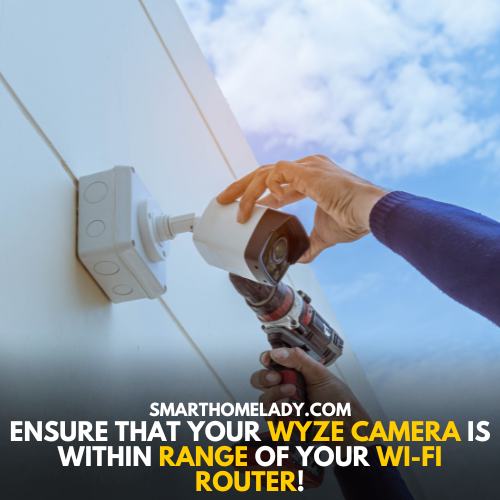
- Firstly, ensure that your camera is within range of your Wi-Fi router and that no physical obstructions are blocking the signal. You can also try restarting your router to refresh the connection.
- Another common issue is incorrect login credentials. Double-check that you are using the correct username and password for your Wyze account.
- In some cases, interference from other devices or neighboring networks can cause connectivity problems. To mitigate this, try changing the channel on your router or moving other electronic devices away from the camera.
- Lastly, ensure you have the latest firmware installed on your camera and mobile device. Regularly updating firmware can address known bugs and improve performance.
Here’s a table summarizing these troubleshooting tips:
| Common Issues | Tips |
|---|---|
| Connectivity problems | Reset the camera by unplugging the power cord |
| Weak Wi-Fi signal | Ensure the camera is within range of the router; remove obstructions |
| Incorrect login credentials | Verify username and password |
| Interference | Change router channel; move electronic devices away |
| Outdated firmware | Update firmware on both camera and mobile device |
Frequently Asked Questions FAQs
Can I set up my Wyze camera without WiFi?
No, setting up a Wyze camera without WiFi is not possible. Wyze cameras rely on a stable WiFi connection to transmit and record video footage.
Without an internet connection, your camera will not be able to function correctly. It will not provide you with the remote access and notifications that make it so useful.
So, unfortunately, if you don’t have access to WiFi, you will not be able to use a Wyze camera to its full potential.
Can someone else connect to my Wyze camera?
Yes, someone else can connect to your Wyze camera with your permission. You can share access to your Wyze camera with others.
You can grant access to trusted individuals like family members or friends so they can view the camera feed or receive alerts.
Just remember to be selective about who you share access with and ensure that you trust them, as they will have the ability to view your camera’s live feed and receive alerts.
Can I use my WYZE cam without a subscription?
Yes, you can use your Wyze camera without a subscription. Wyze provides a free cloud storage plan for 12-second video clips when motion or sound is detected. These clips are stored for 14 days, and you can view them in the Wyze app.
While the free plan has some limitations, it’s still quite useful for basic home security needs.
Conclusion
Setting up your Wyze camera is a simple and straightforward process.
Following the step-by-step guide, you can easily get the required tools, download the Wyze app, power on the camera, connect it to Wi-Fi, position and mount it as desired, set up motion detection and notifications, and adjust camera settings.
If you encounter any issues along the way, refer to the troubleshooting section for helpful tips.
Enjoy using your new Wyze camera for enhanced home security.
References
- Wyze Cam Setup Guide By Wyze Support (Source Link)
- Installation of Wyze Camera In Home (Source Link)
- Reconnection of Wyze Cam To WiFi (Source Link)